Runes are the traits a Monster has that can help himself/herself or your entire team. Each Monster has a Rune attached to them at the start which you cannot replace, and also two empty Rune slots available for extra Runes added by the Runes Building.
Runes Building
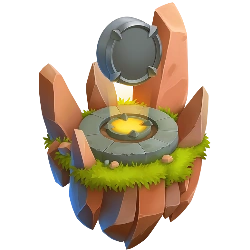
The Runes Building, the Building used to purchase Runes for your Monsters.
The Runes Building is the building used to purchase additional Runes to enhance the capabilities of your Monsters. The building may be purchased at level 28. Each monster may get 1 or 2 Slots extra runes, in addition to the rune it starts with. To Unlock the 3rd slot you need to buy it for 25 ![]() .
.
runes selection
In this screen you select the monster from your list of monsters, and then you see the rune it started with in the RUNE box. If you purchase runes they will appear in the RUNES INVENTORY. If you do not yet have any, then they can be purchased from the item shop for various amounts of gold.
Runes Table
<img data-rte-meta="%7B%22type%22%3A%22ext%22%2C%22placeholder%22%3A1%2C%22wikitext%22%3A%22%3Ctabber%3E%5CnLife%3D%5Cn%7B%7C%20class%3D%5C%22wikitable%5C%22%20border%3D%5C%221%5C%22%20cellpadding%3D%5C%221%5C%22%20cellspacing%3D%5C%221%5C%22%20style%3D%5C%22font-size%3A%208pt%3Bmargin%3A%200px%20auto%3B%20width%3A%20740px%3B%5C%22%5Cn%7C-%5Cn%21%20scope%3D%5C%22col%5C%22%20style%3D%5C%22text-align%3Acenter%3B%20style%3D%5C%22font-size%3A%208pt%3B%5C%22%7C%20Image%5Cn%21%20scope%3D%5C%22col%5C%22%20style%3D%5C%22text-align%3Acenter%3B%20style%3D%5C%22font-size%3A%208pt%3B%5C%22%7C%20Name%5Cn%21%20scope%3D%5C%22col%5C%22%20style%3D%5C%22text-align%3Acenter%3B%20style%3D%5C%22font-size%3A%208pt%3B%5C%22%7C%20Obtain%5Cn%21%20scope%3D%5C%22col%5C%22%20style%3D%5C%22text-align%3Acenter%3B%20style%3D%5C%22font-size%3A%208pt%3B%5C%22%7C%20Cost%5B%5BFile%3AGold_Bar_Icon.png%7C10px%5D%5D%5C%2F%5B%5BFile%3AIcono_gema.png%7C10px%5D%5D%5Cn%21%20scope%3D%5C%22col%5C%22%20style%3D%5C%22text-align%3Acenter%3B%20style%3D%5C%22font-size%3A%208pt%3B%5C%22%7C%20Sell%5B%5BFile%3AIcono_oro.png%7C10px%5D%5D%5Cn%21%20scope%3D%5C%22col%5C%22%20style%3D%5C%22text-align%3Acenter%3B%20style%3D%5C%22font-size%3A%208pt%3B%5C%22%7C%20Level%5Cn%21%20scope%3D%5C%22col%5C%22%20style%3D%5C%22text-align%3Acenter%3B%20style%3D%5C%22font-size%3A%208pt%3B%5C%22%7C%20Description%5Cn%7C-%5Cn%7C%20%5B%5BFile%3ALife-Level-1.png%7Ccenter%7C50px%5D%5D%20%7C%7C%20Life%20Level%201%20%7C%7C%20Runes%20Market%2CRoulette%20Spin%20%7C%7C%20500K%5B%5BFile%3AIcono_oro.png%7C15px%5D%5D%20%7C%7C%205K%5B%5BFile%3AIcono_oro.png%7C15px%5D%5D%20%7C%7C%2028%20%7C%7C%20Increases%20the%20Monster%27s%20life%20by%209%25%5Cn%7C-%5Cn%7C%20%5B%5BFile%3ALife-Level-2.png%7Ccenter%7C50px%5D%5D%20%7C%7C%20Life%20Level%202%20%7C%7C%20Runes%20Market%2CCrafting%20%7C%7C%205%5B%5BFile%3AIcono_gema.png%7C15px%5D%5D%20%7C%7C%201%5B%5BFile%3AIcono_gema.png%7C15px%5D%5D%20%7C%7C%2028%20%7C%7C%20%20Increases%20the%20Monster%27s%20life%20by%2015%25%5Cn%7C-%5Cn%7C%20%5B%5BFile%3ALife-Level-3.png%7Ccenter%7C50px%5D%5D%20%7C%7C%20Life%20Level%203%20%7C%7C%20Runes%20Market%2CCrafting%20%7C%7C%2025%5B%5BFile%3AIcono_gema.png%7C15px%5D%5D%20%7C%7C%202%5B%5BFile%3AIcono_gema.png%7C15px%5D%5D%20%7C%7C%2028%20%7C%7C%20Increases%20the%20Monster%27s%20life%20by%2027%25%5Cn%7C-%5Cn%7C%20%5B%5BFile%3ALife-Level-4.png%7Ccenter%7C50px%5D%5D%20%7C%7C%20Life%20Level%204%20%7C%7C%20Crafting%20%7C%7C%20-%20%7C%7C%204%5B%5BFile%3AIcono_gema.png%7C15px%5D%5D%20%7C%7C%2028%20%7C%7C%20Increases%20the%20Monster%27s%20life%20by%2039%25%5Cn%7C-%5Cn%7C%20%5B%5BFile%3ALife-Level-5.png%7Ccenter%7C50px%5D%5D%20%7C%7C%20Life%20Level%205%20%7C%7C%20Crafting%20%7C%7C%20-%20%7C%7C%2010%5B%5BFile%3AIcono_gema.png%7C15px%5D%5D%20%7C%7C%2028%20%7C%7C%20Increases%20the%20Monster%27s%20life%20by%2054%25%5Cn%7C-%5Cn%7C%20%5B%5BFile%3ALife-Level-6.png%7Ccenter%7C50px%5D%5D%20%7C%7C%20Life%20Level%206%20%7C%7C%20Crafting%20%7C%7C%20-%20%7C%7C%2036%5B%5BFile%3AIcono_gema.png%7C15px%5D%5D%20%7C%7C%2028%20%7C%7C%20Increases%20the%20Monster%27s%20life%20by%2072%25%5Cn%7C-%5Cn%21%20scope%3D%5C%22col%5C%22%20colspan%3D%5C%227%5C%22%20style%3D%5C%22color%3Ared%3Btext-align%3Acenter%3Bfont-size%3A%2010pt%3B%5C%22%7CTeam%20Life%5Cn%7C-%5Cn%21%20scope%3D%5C%22col%5C%22%20style%3D%5C%22text-align%3Acenter%3B%20style%3D%5C%22font-size%3A%208pt%3B%5C%22%7C%20Image%5Cn%21%20scope%3D%5C%22col%5C%22%20style%3D%5C%22text-align%3Acenter%3B%20style%3D%5C%22font-size%3A%208pt%3B%5C%22%7C%20Name%5Cn%21%20scope%3D%5C%22col%5C%22%20style%3D%5C%22text-align%3Acenter%3B%20style%3D%5C%22font-size%3A%208pt%3B%5C%22%7C%20Obtain%5Cn%21%20scope%3D%5C%22col%5C%22%20style%3D%5C%22text-align%3Acenter%3B%20style%3D%5C%22font-size%3A%208pt%3B%5C%22%7C%20Cost%5B%5BFile%3AGold_Bar_Icon.png%7C10px%5D%5D%5C%2F%5B%5BFile%3AIcono_gema.png%7C10px%5D%5D%5Cn%21%20scope%3D%5C%22col%5C%22%20style%3D%5C%22text-align%3Acenter%3B%20style%3D%5C%22font-size%3A%208pt%3B%5C%22%7C%20Sell%5B%5BFile%3AIcono_oro.png%7C10px%5D%5D%5Cn%21%20scope%3D%5C%22col%5C%22%20style%3D%5C%22text-align%3Acenter%3B%20style%3D%5C%22font-size%3A%208pt%3B%5C%22%7C%20Level%5Cn%21%20scope%3D%5C%22col%5C%22%20style%3D%5C%22text-align%3Acenter%3B%20style%3D%5C%22font-size%3A%208pt%3B%5C%22%7C%20Description%5Cn%7C-%5Cn%7C%20%5B%5BFile%3ATeam-Life-Level-1.png%7Ccenter%7C50px%5D%5D%20%7C%7C%20Team%20Life%201%20%7C%7C%20Runes%20Market%2CRoulette%20Spin%20%7C%7C%20500K%5B%5BFile%3AIcono_oro.png%7C15px%5D%5D%20%7C%7C%205K%5B%5BFile%3AIcono_oro.png%7C15px%5D%5D%20%7C%7C%2028%20%7C%7C%20Increases%20all%20the%20monsters%27%20health%20points%20by%204%25%5Cn%7C-%5Cn%7C%20%5B%5BFile%3ATeam-Life-Level-2.png%7Ccenter%7C50px%5D%5D%20%7C%7C%20Team%20Life%202%20%7C%7C%20Runes%20Market%2CCrafting%20%7C%7C%205%5B%5BFile%3AIcono_gema.png%7C15px%5D%5D%20%7C%7C%201%5B%5BFile%3AIcono_gema.png%7C15px%5D%5D%20%7C%7C%2028%20%7C%7C%20Increases%20all%20the%20monsters%27%20health%20points%20by%207%25%5Cn%7C-%5Cn%7C%20%5B%5BFile%3ATeam-Life-Level-3.png%7Ccenter%7C50px%5D%5D%20%7C%7C%20Team%20Life%203%20%7C%7C%20Runes%20Market%2CCrafting%20%7C%7C%2025%5B%5BFile%3AIcono_gema.png%7C15px%5D%5D%20%7C%7C%202%5B%5BFile%3AIcono_gema.png%7C15px%5D%5D%20%7C%7C%2028%20%7C%7C%20Increases%20all%20the%20monsters%27%20health%20points%20by%2010%25%5Cn%7C-%5Cn%7C%20%5B%5BFile%3ATeam-Life-Level-4.png%7Ccenter%7C50px%5D%5D%20%7C%7C%20Team%20Life%204%20%7C%7C%20Crafting%20%7C%7C%20-%20%7C%7C%204%5B%5BFile%3AIcono_gema.png%7C15px%5D%5D%20%7C%7C%2028%20%7C%7C%20Increases%20all%20the%20monsters%27%20health%20points%20by%2013%25%5Cn%7C-%5Cn%7C%20%5B%5BFile%3ATeam-Life-Level-5.png%7Ccenter%7C50px%5D%5D%20%7C%7C%20Team%20Life%205%20%7C%7C%20Crafting%20%7C%7C%20-%20%7C%7C%2010%5B%5BFile%3AIcono_gema.png%7C15px%5D%5D%20%7C%7C%2028%20%7C%7C%20Increases%20all%20the%20monsters%27%20health%20points%20by%2016%25%5Cn%7C-%5Cn%7C%20%5B%5BFile%3ATeam-Life-Level-6.png%7Ccenter%7C50px%5D%5D%20%7C%7C%20Team%20Life%206%20%7C%7C%20Crafting%20%7C%7C%20-%20%7C%7C%2036%5B%5BFile%3AIcono_gema.png%7C15px%5D%5D%20%7C%7C%2028%20%7C%7C%20Increases%20all%20the%20monsters%27%20health%20points%20by%2020%25%5Cn%7C%7D%5Cn%7C-%7C%5CnStrength%3D%5Cn%7B%7C%20class%3D%5C%22wikitable%5C%22%20border%3D%5C%221%5C%22%20cellpadding%3D%5C%221%5C%22%20cellspacing%3D%5C%221%5C%22%20style%3D%5C%22font-size%3A%208pt%3Bmargin%3A%200px%20auto%3B%20width%3A%20740px%3B%5C%22%5Cn%7C-%5Cn%21%20scope%3D%5C%22col%5C%22%20style%3D%5C%22text-align%3Acenter%3B%20style%3D%5C%22font-size%3A%208pt%3B%5C%22%7C%20Image%5Cn%21%20scope%3D%5C%22col%5C%22%20style%3D%5C%22text-align%3Acenter%3B%20style%3D%5C%22font-size%3A%208pt%3B%5C%22%7C%20Name%5Cn%21%20scope%3D%5C%22col%5C%22%20style%3D%5C%22text-align%3Acenter%3B%20style%3D%5C%22font-size%3A%208pt%3B%5C%22%7C%20Obtain%5Cn%21%20scope%3D%5C%22col%5C%22%20style%3D%5C%22text-align%3Acenter%3B%20style%3D%5C%22font-size%3A%208pt%3B%5C%22%7C%20Cost%5B%5BFile%3AGold_Bar_Icon.png%7C10px%5D%5D%5C%2F%5B%5BFile%3AIcono_gema.png%7C10px%5D%5D%5Cn%21%20scope%3D%5C%22col%5C%22%20style%3D%5C%22text-align%3Acenter%3B%20style%3D%5C%22font-size%3A%208pt%3B%5C%22%7C%20Sell%5B%5BFile%3AIcono_oro.png%7C10px%5D%5D%5Cn%21%20scope%3D%5C%22col%5C%22%20style%3D%5C%22text-align%3Acenter%3B%20style%3D%5C%22font-size%3A%208pt%3B%5C%22%7C%20Level%5Cn%21%20scope%3D%5C%22col%5C%22%20style%3D%5C%22text-align%3Acenter%3B%20style%3D%5C%22font-size%3A%208pt%3B%5C%22%7C%20Description%5Cn%7C-%5Cn%7C%20%5B%5BFile%3AStrength-Level-1.png%7Ccenter%7C50px%5D%5D%20%7C%7C%20Strength%20Level%201%20%7C%7C%20Runes%20Market%2CRoulette%20Spin%20%7C%7C%20500%20K%5B%5BFile%3AIcono_oro.png%7C15px%5D%5D%20%7C%7C%205%20K%5B%5BFile%3AIcono_oro.png%7C15px%5D%5D%20%7C%7C%2028%20%7C%7C%20Increase%20monster%20damage%20by%206%25%5Cn%7C-%5Cn%7C%20%5B%5BFile%3AStrength-Level-2.png%7Ccenter%7C50px%5D%5D%20%7C%7C%20Strength%20Level%202%20%7C%7C%20Runes%20Market%2CCrafting%20%7C%7C%205%5B%5BFile%3AIcono_gema.png%7C15px%5D%5D%20%7C%7C%201%5B%5BFile%3AIcono_gema.png%7C15px%5D%5D%20%7C%7C%2028%20%7C%7C%20Increase%20monster%20damage%20by%2012%25%5Cn%7C-%5Cn%7C%20%5B%5BFile%3AStrength-Level-3.png%7Ccenter%7C50px%5D%5D%20%7C%7C%20Strength%20Level%203%20%7C%7C%20Runes%20Market%2CCrafting%20%7C%7C%2025%5B%5BFile%3AIcono_gema.png%7C15px%5D%5D%20%7C%7C%202%5B%5BFile%3AIcono_gema.png%7C15px%5D%5D%20%7C%7C%2028%20%7C%7C%20Increase%20monster%20damage%20by%2024%25%5Cn%7C-%5Cn%7C%20%5B%5BFile%3AStrength-Level-4.png%7Ccenter%7C50px%5D%5D%20%7C%7C%20Strength%20Level%204%20%7C%7C%20Crafting%20%7C%7C%20-%20%7C%7C%204%5B%5BFile%3AIcono_gema.png%7C15px%5D%5D%20%7C%7C%2028%20%7C%7C%20Increase%20monster%20damage%20by%2036%25%5Cn%7C-%5Cn%7C%20%5B%5BFile%3AStrength-Level-5.png%7Ccenter%7C50px%5D%5D%20%7C%7C%20Strength%20Level%205%20%7C%7C%20Crafting%20%7C%7C%20-%20%7C%7C%2010%5B%5BFile%3AIcono_gema.png%7C15px%5D%5D%20%7C%7C%2028%20%7C%7C%20Increase%20monster%20damage%20by%2048%25%5Cn%7C-%5Cn%7C%20%5B%5BFile%3AStrength-Level-6.png%7Ccenter%7C50px%5D%5D%20%7C%7C%20Strength%20Level%206%20%7C%7C%20Crafting%20%7C%7C%20-%20%7C%7C%2036%5B%5BFile%3AIcono_gema.png%7C15px%5D%5D%20%7C%7C%2028%20%7C%7C%20Increase%20monster%20damage%20by%2066%25%5Cn%7C-%5Cn%21%20scope%3D%5C%22col%5C%22%20colspan%3D%5C%227%5C%22%20style%3D%5C%22color%3Ared%3Btext-align%3Acenter%3Bfont-size%3A%2010pt%3B%5C%22%7CTeam%20Strength%5Cn%7C-%5Cn%21%20scope%3D%5C%22col%5C%22%20style%3D%5C%22text-align%3Acenter%3B%20style%3D%5C%22font-size%3A%208pt%3B%5C%22%7C%20Image%5Cn%21%20scope%3D%5C%22col%5C%22%20style%3D%5C%22text-align%3Acenter%3B%20style%3D%5C%22font-size%3A%208pt%3B%5C%22%7C%20Name%5Cn%21%20scope%3D%5C%22col%5C%22%20style%3D%5C%22text-align%3Acenter%3B%20style%3D%5C%22font-size%3A%208pt%3B%5C%22%7C%20Obtain%5Cn%21%20scope%3D%5C%22col%5C%22%20style%3D%5C%22text-align%3Acenter%3B%20style%3D%5C%22font-size%3A%208pt%3B%5C%22%7C%20Cost%5B%5BFile%3AGold_Bar_Icon.png%7C10px%5D%5D%5C%2F%5B%5BFile%3AIcono_gema.png%7C10px%5D%5D%5Cn%21%20scope%3D%5C%22col%5C%22%20style%3D%5C%22text-align%3Acenter%3B%20style%3D%5C%22font-size%3A%208pt%3B%5C%22%7C%20Sell%5B%5BFile%3AIcono_oro.png%7C10px%5D%5D%5Cn%21%20scope%3D%5C%22col%5C%22%20style%3D%5C%22text-align%3Acenter%3B%20style%3D%5C%22font-size%3A%208pt%3B%5C%22%7C%20Level%5Cn%21%20scope%3D%5C%22col%5C%22%20style%3D%5C%22text-align%3Acenter%3B%20style%3D%5C%22font-size%3A%208pt%3B%5C%22%7C%20Description%5Cn%7C-%5Cn%7C%20%5B%5BFile%3ATeam-Strength-Level-1.png%7Ccenter%7C50px%5D%5D%20%7C%7C%20Team%20Strength%201%20%7C%7C%20Runes%20Market%2CRoulette%20spin%20%7C%7C%20500%20K%5B%5BFile%3AIcono_oro.png%7C15px%5D%5D%20%7C%7C%205%20K%5B%5BFile%3AIcono_oro.png%7C15px%5D%5D%20%7C%7C%2028%20%7C%7C%20Increases%20the%20Monster%27s%20damage%20by%204%25%5Cn%7C-%5Cn%7C%20%5B%5BFile%3ATeam-Strength-Level-2.png%7Ccenter%7C50px%5D%5D%20%7C%7C%20Team%20Strength%202%20%7C%7C%20Runes%20Market%2CCrafting%20%7C%7C%205%5B%5BFile%3AIcono_gema.png%7C15px%5D%5D%20%7C%7C%201%5B%5BFile%3AIcono_gema.png%7C15px%5D%5D%20%7C%7C%2028%20%7C%7C%20Increases%20the%20Monster%27s%20damage%20by%207%25%5Cn%7C-%5Cn%7C%20%5B%5BFile%3ATeam-Strength-Level-3.png%7Ccenter%7C50px%5D%5D%20%7C%7C%20Team%20Strength%203%20%7C%7C%20Runes%20Market%2CCrafting%20%7C%7C%2025%5B%5BFile%3AIcono_gema.png%7C15px%5D%5D%20%7C%7C%202%5B%5BFile%3AIcono_gema.png%7C15px%5D%5D%20%7C%7C%2028%20%7C%7C%20Increases%20the%20Monster%27s%20damage%20by%2010%25%5Cn%7C-%5Cn%7C%20%5B%5BFile%3ATeam-Strength-Level-4.png%7Ccenter%7C50px%5D%5D%20%7C%7C%20Team%20Strength%204%20%7C%7C%20Crafting%20%7C%7C%20-%20%7C%7C%204%5B%5BFile%3AIcono_gema.png%7C15px%5D%5D%20%7C%7C%2028%20%7C%7C%20Increases%20the%20Monster%27s%20damage%20by%2013%25%5Cn%7C-%5Cn%7C%20%5B%5BFile%3ATeam-Strength-Level-5.png%7Ccenter%7C50px%5D%5D%20%7C%7C%20Team%20Strength%205%20%7C%7C%20Crafting%20%7C%7C%20-%20%7C%7C%2010%5B%5BFile%3AIcono_gema.png%7C15px%5D%5D%20%7C%7C%2028%20%7C%7C%20Increases%20the%20Monster%27s%20damage%20by%2016%25%5Cn%7C-%5Cn%7C%20%5B%5BFile%3ATeam-Strength-Level-6.png%7Ccenter%7C50px%5D%5D%20%7C%7C%20Team%20Strength%206%20%7C%7C%20Crafting%20%7C%7C%20-%20%7C%7C%2036%5B%5BFile%3AIcono_gema.png%7C15px%5D%5D%20%7C%7C%2028%20%7C%7C%20Increases%20the%20Monster%27s%20damage%20by%2019%25%5Cn%7C%7D%5Cn%7C-%7C%5CnSpeed%3D%5Cn%7B%7C%20class%3D%5C%22wikitable%5C%22%20border%3D%5C%221%5C%22%20cellpadding%3D%5C%221%5C%22%20cellspacing%3D%5C%221%5C%22%20style%3D%5C%22font-size%3A%208pt%3Bmargin%3A%200px%20auto%3B%20width%3A%20740px%3B%5C%22%5Cn%7C-%5Cn%21%20scope%3D%5C%22col%5C%22%20style%3D%5C%22text-align%3Acenter%3B%20style%3D%5C%22font-size%3A%208pt%3B%5C%22%7C%20Image%5Cn%21%20scope%3D%5C%22col%5C%22%20style%3D%5C%22text-align%3Acenter%3B%20style%3D%5C%22font-size%3A%208pt%3B%5C%22%7C%20Name%5Cn%21%20scope%3D%5C%22col%5C%22%20style%3D%5C%22text-align%3Acenter%3B%20style%3D%5C%22font-size%3A%208pt%3B%5C%22%7C%20Obtain%5Cn%21%20scope%3D%5C%22col%5C%22%20style%3D%5C%22text-align%3Acenter%3B%20style%3D%5C%22font-size%3A%208pt%3B%5C%22%7C%20Cost%5B%5BFile%3AGold_Bar_Icon.png%7C10px%5D%5D%5C%2F%5B%5BFile%3AIcono_gema.png%7C10px%5D%5D%5Cn%21%20scope%3D%5C%22col%5C%22%20style%3D%5C%22text-align%3Acenter%3B%20style%3D%5C%22font-size%3A%208pt%3B%5C%22%7C%20Sell%5B%5BFile%3AIcono_oro.png%7C10px%5D%5D%5Cn%21%20scope%3D%5C%22col%5C%22%20style%3D%5C%22text-align%3Acenter%3B%20style%3D%5C%22font-size%3A%208pt%3B%5C%22%7C%20Level%5Cn%21%20scope%3D%5C%22col%5C%22%20style%3D%5C%22text-align%3Acenter%3B%20style%3D%5C%22font-size%3A%208pt%3B%5C%22%7C%20Description%5Cn%7C-%5Cn%7C%20%5B%5BFile%3ASpeed-Level-1.png%7Ccenter%7C50px%5D%5D%20%7C%7C%20Speed%20Level%201%20%7C%7C%20Runes%20Market%2CRoulette%20Spin%20%7C%7C%20500%20K%5B%5BFile%3AIcono_oro.png%7C15px%5D%5D%20%7C%7C%205%20K%5B%5BFile%3AIcono_oro.png%7C15px%5D%5D%20%7C%7C%2028%20%7C%7C%20Increases%20the%20Monster%27s%20speed%20by%204%25%5Cn%7C-%5Cn%7C%20%5B%5BFile%3ASpeed-Level-2.png%7Ccenter%7C50px%5D%5D%20%7C%7C%20Speed%20Level%202%20%7C%7C%20Runes%20Market%2CCrafting%20%7C%7C%205%5B%5BFile%3AIcono_gema.png%7C15px%5D%5D%20%7C%7C%201%5B%5BFile%3AIcono_gema.png%7C15px%5D%5D%20%7C%7C%2028%20%7C%7C%20Increases%20the%20Monster%27s%20speed%20by%208%25%5Cn%7C-%5Cn%7C%20%5B%5BFile%3ASpeed-Level-3.png%7Ccenter%7C50px%5D%5D%20%7C%7C%20Speed%20Level%203%20%7C%7C%20Runes%20Market%2CCrafting%20%7C%7C%2025%5B%5BFile%3AIcono_gema.png%7C15px%5D%5D%20%7C%7C%202%5B%5BFile%3AIcono_gema.png%7C15px%5D%5D%20%7C%7C%2028%20%7C%7C%20Increases%20the%20Monster%27s%20speed%20by%2012%25%5Cn%7C-%5Cn%7C%20%5B%5BFile%3ASpeed-Level-4.png%7Ccenter%7C50px%5D%5D%20%7C%7C%20Speed%20Level%204%20%7C%7C%20Crafting%20%7C%7C%20-%20%7C%7C%204%5B%5BFile%3AIcono_gema.png%7C15px%5D%5D%20%7C%7C%2028%20%7C%7C%20Increases%20the%20Monster%27s%20speed%20by%2016%25%5Cn%7C-%5Cn%7C%20%5B%5BFile%3ASpeed-Level-5.png%7Ccenter%7C50px%5D%5D%20%7C%7C%20Speed%20Level%205%20%7C%7C%20Crafting%20%7C%7C%20-%20%7C%7C%2010%5B%5BFile%3AIcono_gema.png%7C15px%5D%5D%20%7C%7C%2028%20%7C%7C%20Increases%20the%20Monster%27s%20speed%20by%2020%25%5Cn%7C-%5Cn%7C%20%5B%5BFile%3ASpeed-Level-6.png%7Ccenter%7C50px%5D%5D%20%7C%7C%20Speed%20Level%206%20%7C%7C%20Crafting%20%7C%7C%20-%20%7C%7C%2036%5B%5BFile%3AIcono_gema.png%7C15px%5D%5D%20%7C%7C%2028%20%7C%7C%20Increases%20the%20Monster%27s%20speed%20by%2024%25%5Cn%7C-%5Cn%21%20scope%3D%5C%22col%5C%22%20colspan%3D%5C%227%5C%22%20style%3D%5C%22color%3Ared%3Btext-align%3Acenter%3Bfont-size%3A%2010pt%3B%5C%22%7CTeam%20Speed%5Cn%7C-%5Cn%21%20scope%3D%5C%22col%5C%22%20style%3D%5C%22text-align%3Acenter%3B%20style%3D%5C%22font-size%3A%208pt%3B%5C%22%7C%20Image%5Cn%21%20scope%3D%5C%22col%5C%22%20style%3D%5C%22text-align%3Acenter%3B%20style%3D%5C%22font-size%3A%208pt%3B%5C%22%7C%20Name%5Cn%21%20scope%3D%5C%22col%5C%22%20style%3D%5C%22text-align%3Acenter%3B%20style%3D%5C%22font-size%3A%208pt%3B%5C%22%7C%20Obtain%5Cn%21%20scope%3D%5C%22col%5C%22%20style%3D%5C%22text-align%3Acenter%3B%20style%3D%5C%22font-size%3A%208pt%3B%5C%22%7C%20Cost%5B%5BFile%3AGold_Bar_Icon.png%7C10px%5D%5D%5C%2F%5B%5BFile%3AIcono_gema.png%7C10px%5D%5D%5Cn%21%20scope%3D%5C%22col%5C%22%20style%3D%5C%22text-align%3Acenter%3B%20style%3D%5C%22font-size%3A%208pt%3B%5C%22%7C%20Sell%5B%5BFile%3AIcono_oro.png%7C10px%5D%5D%5Cn%21%20scope%3D%5C%22col%5C%22%20style%3D%5C%22text-align%3Acenter%3B%20style%3D%5C%22font-size%3A%208pt%3B%5C%22%7C%20Level%5Cn%21%20scope%3D%5C%22col%5C%22%20style%3D%5C%22text-align%3Acenter%3B%20style%3D%5C%22font-size%3A%208pt%3B%5C%22%7C%20Description%5Cn%7C-%5Cn%7C%20%5B%5BFile%3ATeam-Speed-Level-1.png%7Ccenter%7C50px%5D%5D%20%7C%7C%20Team%20Speed%201%20%7C%7C%20Runes%20Market%2CRoulette%20Spin%20%7C%7C%20500%20K%5B%5BFile%3AIcono_oro.png%7C15px%5D%5D%20%7C%7C%205%20K%5B%5BFile%3AIcono_oro.png%7C15px%5D%5D%20%7C%7C%2028%20%7C%7C%20Increases%20the%20Monster%27s%20speed%20by%203%25%5Cn%7C-%5Cn%7C%20%5B%5BFile%3ATeam-Speed-Level-2.png%7Ccenter%7C50px%5D%5D%20%7C%7C%20Team%20Speed%202%20%7C%7C%20Runes%20Market%2CCrafting%20%7C%7C%205%5B%5BFile%3AIcono_gema.png%7C15px%5D%5D%20%7C%7C%201%5B%5BFile%3AIcono_gema.png%7C15px%5D%5D%20%7C%7C%2028%20%7C%7C%20Increases%20the%20Monster%27s%20speed%20by%204%25%5Cn%7C-%5Cn%7C%20%5B%5BFile%3ATeam-Speed-Level-3.png%7Ccenter%7C50px%5D%5D%20%7C%7C%20Team%20Speed%203%20%7C%7C%20Runes%20Market%2CCrafting%20%7C%7C%2025%5B%5BFile%3AIcono_gema.png%7C15px%5D%5D%20%7C%7C%202%5B%5BFile%3AIcono_gema.png%7C15px%5D%5D%20%7C%7C%2028%20%7C%7C%20Increases%20the%20Monster%27s%20speed%20by%205%25%5Cn%7C-%5Cn%7C%20%5B%5BFile%3ATeam-Speed-Level-4.png%7Ccenter%7C50px%5D%5D%20%7C%7C%20Team%20Speed%204%20%7C%7C%20Crafting%20%7C%7C%20-%20%7C%7C%204%5B%5BFile%3AIcono_gema.png%7C15px%5D%5D%20%7C%7C%2028%20%7C%7C%20Increases%20the%20Monster%27s%20speed%20by%206%25%5Cn%7C-%5Cn%7C%20%5B%5BFile%3ATeam-Speed-Level-5.png%7Ccenter%7C50px%5D%5D%20%7C%7C%20Team%20Speed%205%20%7C%7C%20Crafting%20%7C%7C%20%20-%7C%7C%2010%5B%5BFile%3AIcono_gema.png%7C15px%5D%5D%20%7C%7C%2028%20%7C%7C%20Increases%20the%20Monster%27s%20speed%20by%207%25%5Cn%7C-%5Cn%7C%20%5B%5BFile%3ATeam-Speed-Level-6.png%7Ccenter%7C50px%5D%5D%20%7C%7C%20Team%20Speed%206%20%7C%7C%20Crafting%20%7C%7C%20-%20%7C%7C%2036%5B%5BFile%3AIcono_gema.png%7C15px%5D%5D%20%7C%7C%2028%20%7C%7C%20Increases%20the%20Monster%27s%20speed%20by%208%25%5Cn%7C%7D%5Cn%7C-%7C%5CnStamina%3D%5Cn%7B%7C%20class%3D%5C%22wikitable%5C%22%20border%3D%5C%221%5C%22%20cellpadding%3D%5C%221%5C%22%20cellspacing%3D%5C%221%5C%22%20style%3D%5C%22font-size%3A%208pt%3Bmargin%3A%200px%20auto%3B%20width%3A%20740px%3B%5C%22%5Cn%7C-%5Cn%21%20scope%3D%5C%22col%5C%22%20style%3D%5C%22text-align%3Acenter%3B%20style%3D%5C%22font-size%3A%208pt%3B%5C%22%7C%20Image%5Cn%21%20scope%3D%5C%22col%5C%22%20style%3D%5C%22text-align%3Acenter%3B%20style%3D%5C%22font-size%3A%208pt%3B%5C%22%7C%20Name%5Cn%21%20scope%3D%5C%22col%5C%22%20style%3D%5C%22text-align%3Acenter%3B%20style%3D%5C%22font-size%3A%208pt%3B%5C%22%7C%20Obtain%5Cn%21%20scope%3D%5C%22col%5C%22%20style%3D%5C%22text-align%3Acenter%3B%20style%3D%5C%22font-size%3A%208pt%3B%5C%22%7C%20Cost%5B%5BFile%3AGold_Bar_Icon.png%7C10px%5D%5D%5C%2F%5B%5BFile%3AIcono_gema.png%7C10px%5D%5D%5Cn%21%20scope%3D%5C%22col%5C%22%20style%3D%5C%22text-align%3Acenter%3B%20style%3D%5C%22font-size%3A%208pt%3B%5C%22%7C%20Sell%5B%5BFile%3AIcono_oro.png%7C10px%5D%5D%5Cn%21%20scope%3D%5C%22col%5C%22%20style%3D%5C%22text-align%3Acenter%3B%20style%3D%5C%22font-size%3A%208pt%3B%5C%22%7C%20Level%5Cn%21%20scope%3D%5C%22col%5C%22%20style%3D%5C%22text-align%3Acenter%3B%20style%3D%5C%22font-size%3A%208pt%3B%5C%22%7C%20Description%5Cn%7C-%5Cn%7C%20%5B%5BFile%3AStamina-Level-1.png%7Ccenter%7C50px%5D%5D%20%7C%7C%20Stamina%20Level%201%20%7C%7C%20Runes%20Market%2CRoulette%20Spin%20%7C%7C%20500%20K%5B%5BFile%3AIcono_oro.png%7C15px%5D%5D%20%7C%7C%205%20K%5B%5BFile%3AIcono_oro.png%7C15px%5D%5D%20%7C%7C%2028%20%7C%7C%20Increases%20the%20Monster%27s%20stamina%20by%2015%25%5Cn%7C-%5Cn%7C%20%5B%5BFile%3AStamina-Level-2.png%7Ccenter%7C50px%5D%5D%20%7C%7C%20Stamina%20Level%202%20%7C%7C%20Runes%20Market%2CCrafting%20%7C%7C%205%5B%5BFile%3AIcono_gema.png%7C15px%5D%5D%20%7C%7C%201%5B%5BFile%3AIcono_gema.png%7C15px%5D%5D%20%7C%7C%2028%20%7C%7C%20Increases%20the%20Monster%27s%20stamina%20by%2035%25%5Cn%7C-%5Cn%7C%20%5B%5BFile%3AStamina-Level-3.png%7Ccenter%7C50px%5D%5D%20%7C%7C%20Stamina%20Level%203%20%7C%7C%20Runes%20Market%2CCrafting%20%7C%7C%2025%5B%5BFile%3AIcono_gema.png%7C15px%5D%5D%20%7C%7C%202%5B%5BFile%3AIcono_gema.png%7C15px%5D%5D%20%7C%7C%2028%20%7C%7C%20Increases%20the%20Monster%27s%20stamina%20by%2050%25%5Cn%7C-%5Cn%7C%20%5B%5BFile%3AStamina-Level-4.png%7Ccenter%7C50px%5D%5D%20%7C%7C%20Stamina%20Level%204%20%7C%7C%20Crafting%20%7C%7C%20-%20%7C%7C%204%5B%5BFile%3AIcono_gema.png%7C15px%5D%5D%20%7C%7C%2028%20%7C%7C%20Increases%20the%20Monster%27s%20stamina%20by%2065%25%5Cn%7C-%5Cn%7C%20%5B%5BFile%3AStamina-Level-5.png%7Ccenter%7C50px%5D%5D%20%7C%7C%20Stamina%20Level%205%20%7C%7C%20Crafting%20%7C%7C%20-%20%7C%7C%2010%5B%5BFile%3AIcono_gema.png%7C15px%5D%5D%20%7C%7C%2028%20%7C%7C%20Increases%20the%20Monster%27s%20stamina%20by%2080%25%5Cn%7C-%5Cn%7C%20%5B%5BFile%3AStamina-Level-6.png%7Ccenter%7C50px%5D%5D%20%7C%7C%20Stamina%20Level%206%20%7C%7C%20Crafting%20%7C%7C%20-%20%7C%7C%2036%5B%5BFile%3AIcono_gema.png%7C15px%5D%5D%20%7C%7C%2028%20%7C%7C%20Increases%20the%20Monster%27s%20stamina%20by%20100%25%5Cn%7C-%5Cn%21%20scope%3D%5C%22col%5C%22%20colspan%3D%5C%227%5C%22%20style%3D%5C%22color%3Ared%3Btext-align%3Acenter%3Bfont-size%3A%2010pt%3B%5C%22%7CTeam%20Stamina%5Cn%7C-%5Cn%21%20scope%3D%5C%22col%5C%22%20style%3D%5C%22text-align%3Acenter%3B%20style%3D%5C%22font-size%3A%208pt%3B%5C%22%7C%20Image%5Cn%21%20scope%3D%5C%22col%5C%22%20style%3D%5C%22text-align%3Acenter%3B%20style%3D%5C%22font-size%3A%208pt%3B%5C%22%7C%20Name%5Cn%21%20scope%3D%5C%22col%5C%22%20style%3D%5C%22text-align%3Acenter%3B%20style%3D%5C%22font-size%3A%208pt%3B%5C%22%7C%20Obtain%5Cn%21%20scope%3D%5C%22col%5C%22%20style%3D%5C%22text-align%3Acenter%3B%20style%3D%5C%22font-size%3A%208pt%3B%5C%22%7C%20Cost%5B%5BFile%3AGold_Bar_Icon.png%7C10px%5D%5D%5C%2F%5B%5BFile%3AIcono_gema.png%7C10px%5D%5D%5Cn%21%20scope%3D%5C%22col%5C%22%20style%3D%5C%22text-align%3Acenter%3B%20style%3D%5C%22font-size%3A%208pt%3B%5C%22%7C%20Sell%5B%5BFile%3AIcono_oro.png%7C10px%5D%5D%5Cn%21%20scope%3D%5C%22col%5C%22%20style%3D%5C%22text-align%3Acenter%3B%20style%3D%5C%22font-size%3A%208pt%3B%5C%22%7C%20Level%5Cn%21%20scope%3D%5C%22col%5C%22%20style%3D%5C%22text-align%3Acenter%3B%20style%3D%5C%22font-size%3A%208pt%3B%5C%22%7C%20Description%5Cn%7C-%5Cn%7C%20%5B%5BFile%3ATeam-Stamina-Level-1.png%7Ccenter%7C50px%5D%5D%20%7C%7C%20Team%20Stamina%201%20%7C%7C%20Runes%20Market%2CRoulette%20Spin%20%7C%7C%20500%20K%5B%5BFile%3AIcono_oro.png%7C15px%5D%5D%20%7C%7C%205%20K%5B%5BFile%3AIcono_oro.png%7C15px%5D%5D%20%7C%7C%2028%20%7C%7C%20Increases%20all%20the%20monsters%27%20stamina%20points%20by%204%25%5Cn%7C-%5Cn%7C%20%5B%5BFile%3ATeam-Stamina-Level-2.png%7Ccenter%7C50px%5D%5D%20%7C%7C%20Team%20Stamina%202%20%7C%7C%20Runes%20Market%2CCrafting%20%7C%7C%205%5B%5BFile%3AIcono_gema.png%7C15px%5D%5D%20%7C%7C%201%5B%5BFile%3AIcono_gema.png%7C15px%5D%5D%20%7C%7C%2028%20%7C%7C%20Increases%20all%20the%20monsters%27%20stamina%20points%20by%209%25%5Cn%7C-%5Cn%7C%20%5B%5BFile%3ATeam-Stamina-Level-3.png%7Ccenter%7C50px%5D%5D%20%7C%7C%20Team%20Stamina%203%20%7C%7C%20Runes%20Market%2CCrafting%20%7C%7C%2025%5B%5BFile%3AIcono_gema.png%7C15px%5D%5D%20%7C%7C%202%5B%5BFile%3AIcono_gema.png%7C15px%5D%5D%20%7C%7C%2028%20%7C%7C%20Increases%20all%20the%20monsters%27%20stamina%20points%20by%2014%25%5Cn%7C-%5Cn%7C%20%5B%5BFile%3ATeam-Stamina-Level-4.png%7Ccenter%7C50px%5D%5D%20%7C%7C%20Team%20Stamina%204%20%7C%7C%20Crafting%20%7C%7C%20-%20%7C%7C%204%5B%5BFile%3AIcono_gema.png%7C15px%5D%5D%20%7C%7C%2028%20%7C%7C%20Increases%20all%20the%20monsters%27%20stamina%20points%20by%2019%25%5Cn%7C-%5Cn%7C%20%5B%5BFile%3ATeam-Stamina-Level-5.png%7Ccenter%7C50px%5D%5D%20%7C%7C%20Team%20Stamina%205%20%7C%7C%20Crafting%20%7C%7C%20-%20%7C%7C%2010%5B%5BFile%3AIcono_gema.png%7C15px%5D%5D%20%7C%7C%2028%20%7C%7C%20Increases%20all%20the%20monsters%27%20stamina%20points%20by%2024%25%5Cn%7C-%5Cn%7C%20%5B%5BFile%3ATeam-Stamina-Level-6.png%7Ccenter%7C50px%5D%5D%20%7C%7C%20Team%20Stamina%206%20%7C%7C%20Crafting%20%7C%7C%20-%20%7C%7C%2036%5B%5BFile%3AIcono_gema.png%7C15px%5D%5D%20%7C%7C%2028%20%7C%7C%20Increases%20all%20the%20monsters%27%20stamina%20points%20by%2030%25%5Cn%7C%7D%5Cn%3C%5C%2Ftabber%3E%22%7D" data-rte-instance="752307-20727933995699551b3ba7b" class="placeholder placeholder-ext" src="data:image/gif;base64,R0lGODlhAQABAIABAAAAAP///yH5BAEAAAEALAAAAAABAAEAQAICTAEAOw%3D%3D" type="ext" />